Tuesday, October 15, 2013

Leaning Tower of Polenta - Zucchini + Polenta Stacks


I had my 29th birthday in August this year. I couldn't believe this was the last year of my twentiesTo celebrate, A took me to a lovely, modern, minimalistic Italian restaurant. I find that these modern places have a lot more vegetarian options than the typical, traditional Italian ones. We started off with a delicious dish called Polenta Fries, which was basically fried polenta sticks with a Fontina cheese dip. That was my very first taste of polenta and LOVED it.

Polenta is just corn meal / corn grits. It is extensively used in Italian cuisine and is very quick and easy to prepare. It is very versatile and can be used in several ways.

Preparing polenta is just like pasta: boil in salted water. It cooks in about 15 minutes and has a very creamy texture without having to add heavy cream. Once it cools down, it solidifies a little and can be removed from the pan to look like a sponge cake.

For this dish, I cut the polenta into cubes, grilled some zucchini ribbons and stacked them to make my leaning tower!

Served with a refreshing salad and a basil-yogurt sauce. Delizioso!


Ingredients:
1/2 cup uncooked polenta
 2.5 cups water
1 tbsp unsalted butter
1 zucchini - cut into 2 inch slices
1 cup arugula
1/4 cup Pecans - Toasted in the oven for 5 mins at 350F and roughly chopped
Olive oil
Salt to taste

Sauce:
1/2 packed cup fresh basil leaves
1/4 cup non-fat Greek Yogurt
3 tablespoons extra-virgin olive oil
1 tablespoon water
1 garlic clove, coarsely chopped
2 teaspoons fresh lemon juice
1/4 teaspoon salt, plus extra, as needed
1/4 teaspoon freshly ground black pepper, plus extra, as needed

This recipe serves 2
  1. To cook the polenta: bring 2 cups of slightly salted water to boil. Slowly whisk in the polenta and keep whisking till it starts cooking just a bit. Add the 1 tbsp of butter and continue mixing gently for about 5 - 8 minutes. Taste and continue cooking for another minute if needed. Set aside to cool.
  2. Drizzle some olive oil in a skillet and grill the zucchini slices with a dash of salt. These need to cook on each side for about 3 minutes until brown. Set aside.
  3. Once the polenta has cooled. just invert the pan over a plate. Cut the polenta into cubes of any size. Brush some more oil on the pan and grill the polenta on both sides. This takes longer than the zucchini. It needs to slightly brown, so grill this for about 5 minutes on each side.
  4. Assemble the dish by stacking the polenta cubes and zucchini slices alternatingly. Serve with arugula and toasted pecans.
For the sauce:
In a blender, combine the basil, greek yogurt, olive oil, water, garlic, lemon juice, salt, and pepper. Blend until smooth.

Pour the sauce over the stacks and enjoy your Leaning Tower of Polenta!

Friday, September 20, 2013

Grilled Veggie Sandwich


I have a confession to make. It isn't one that I am terribly proud of... not even one that I will admit to if you ask me about it in the real world. But, this is cyberspace. Anything goes, right? Having said that, here is my deep dark secret. I *bleeping* LOVE vegetable shopping. It's true. I do! I LOVE going on weekends, where I don't really have to worry about going home early to cook or think about any pending work that I might have on that day. It is bad, people. Ask me if I want to go out on a hike or do some kayaking and I will say 'Nope, just drop me off at your nearest Shoprite.' It is crazy, I have never admitted this to anyone before, not even to myself! Nonetheless, it is true. I have been thoroughly domesticated.

This week was a good one for me, produce-wise. I got a whole bunch of zucchinis, Japanese eggplant and some gorgeous peaches. I also lucked out and got my new FAVORITE green: Baby Arugula! I decided to put it all to good use today and made myself a delicious sandwich with a refreshing side salad.

Let's first start with the sandwich. First you need a few veggies. I used onions, peppers, eggplant and zucchini. You can also use sun-dried tomatoes or regular tomatoes.


Grill these veggies in a grill pan or even a skillet. Assemble the sandwich on a bread of your choice with some lettuce and feta cheese. That's that!


Ingredients:
4 slices of bread of your choice - toasted slightly
1 zucchini
1/2 onion
2 slices of Japanese Eggplant
2 leaves of butter lettuce
1 tbsp feta cheese
1/4th of orange peppers
1 tsp red chili pepper flakes
1 tsp oregano
2 tsp olive oil
Salt and ground black pepper to taste

This recipe serves 2
  1. Slice your vegetables as shows in the picture and place them in a bowl with about a tsp of olive oil. Add the salt, pepper, red chili pepper flakes and oregano. Mix until the vegetables are well coated with the seasoning.
  2. Heat a tsp of olive oil on a skillet or the grill. Grill the veggies until they are well cooked and tender cooked on both sides. 
  3. Separate the two slices of bread and start assembling the sandwich. On one slice, place the lettuce topped with the grilled veggies. On the other slice, place a generous amount of feta cheese.
  4. Finally, press the two slices together and enjoy with a side of Arugula and Peach salad!

Refreshing Peach + Arugula Salad


I initially made this salad just to have something light and refreshing to eat for dinner on my more *ahem* "full-figured" days. However, it is just so easy to put-together that I have started using it as a side salad for my everyday dinner. It is a simple salad with very light ingredients and easy seasoning so I always try to use fresh produce to really bring out the flavours of this salad.

Ingredients:
Baby Arugula
Baby Spinach
1 Peach
1/2 cup Pecans or Walnuts 
1 tbsp crumbled feta cheese

For the dressing:
Extra Virgin olive oil
Few drops of lime juice
salt and pepper to taste
  1. Cut the peach into small triangular pieces of about an inch and a half in length.
  2. Toast the pecans or walnuts in a skillet and break into smaller pieces.
  3. Arrange the arugula and spinach in a salad plate and top with the peach slices and pecans. Drizzle with the desired amount of dressing. Top with some feta cheese, mix well and enjoy!

Saturday, September 14, 2013

Quinoa and Black Bean Casserole


Quinoa is a staple in my house. I was initially introduced to quinoa  in a salad and I didn't think much of it. It gave a little texture to the dish but didn't add too much in terms of taste. So that was that for me. I put the little  bag of Quinoa at the back of my pantry and forgot all about it.

A few months later, I went to my cousin's house for Golu :). And dinner. Arvind and I had a lovely time catching up with them and eventually the conversation turned (as it so often does these days) to healthy food. They told us, to my utter shock and surprise, that they had replaced their daily rice consumption with Quinoa. As in Quinoa+Sambar, Quinoa+Rasam etc. I had a little taste at their house and I liked it. I came home, fished out the little baggy from the back of my pantry and set forth making Sambar and Quinoa for lunch the next day. Thus began my intense love affair with this beautiful grain.

Quinoa (pronounced keen-wah) is grown primarily in Peru so we had some lovely local quinoa dishes when we were there. This is us looking proud as hell at Machu Pichu :) :)


Now, on to the dish. This is actually the first dish I ever made with my own recipe. I did this in an attempt to make something different with quinoa which seems to have so many possibilities. This has become such a staple in my house that it didn't ever occur to me to post it until recently :)

It basically needs some quinoa, cooked black beans, onions and some veggies to get it started. Saute the Onions, Veggies and cooked beans with some spices. Add the quinoa.

Assemble this mixture in a baking pan and top with some cheese.


Bake for about 15 minutes at 350F and serve topped with Greek yogurt.
Delicious! :D

Ingredients:
1 cup cooked quinoa
1 cup cooked black beans
1 onion - chopped
1/2 red pepper - seeded and chopped
1/2 green pepper - seeded and chopped
1 jalapeno - seeded and chopped
1/2 cup frozen corn
2 tsp cumin
4 tsp crushed red pepper flakes
4 tsp oregano
1.5 tbsp lime juice
2.5 tbsp red chili sauce
1/2 cup shredded cheddar or mozzarella cheese
2 tbsp olive oil
salt and pepper to taste

This recipe serves 2

  1. Heat 1 tbsp olive oil and saute the onion with some salt and pepper for about 2 minutes, until transparent. Add the chopped peppers, corn and jalapeno and saute for another 5 minutes, until slightly cooked.
  2. Mash the cooked black beans with a little water and add to the veggies. Add the cumin, red pepper flakes, oregano lime juice and red chilli sauce. Adjust all the spices as needed according to your taste. Saute for about 3-5 minutes until the mixture combines,
  3. Add the quinoa to the pan. Sprinkle a little water if this looks too dry. Mix well and taste to adjust the salt as needed. Add the remaining 1 tbsp olive oil and mix until well combined
  4. Assemble the mixture in a baking pan. Top with shredded cheese and bake for about 15 minutes at 350F until the cheese melts
  5. Top with a dollop of Greek yogurt or sour cream and enjoy!

Monday, August 26, 2013

Colour me Coffee

I personally really love DIY projects. Lets be honest, I am kind of crap with crafty things. But, I recently saw something on TV where someone was making a beautiful display case with coffee stirrers. This looked SO easy and pretty that I just had to try it out for myself!

This is what i ended up with... Pretty huh? :) It is now happily sitting on my IKEA ledge. Next to a picture of my former pet cat Ozzy looking adorable as hell in his Santa hat. That is his Santa Claws picture.

Ok, looks like you now have an insight into my 'crazy cat lady' persona. Lets avoid eye contact for a while and move on, shall we?

You need: 
Coffee Stirrers
Shadow box frame
Chart paper or any other sturdy paper
Liquid Glue
Acrylic colour set
Paint brushes

I started off with *ahem* borrowing some wooden stirrers from Starbucks. About 15 sticks should do fine.


Measure the width of the shadow box frame you are using. I used IKEA's Ribba Frame, measuring about 9 cm in width. Be sure to measure only the glassed area and no the entire wooden borders. Cut the stirrers to the appropriate length. Now, pick a few beautiful acrylic colours. Go crazy here.. mix up a few colours to create new shades. Let your inner artist shine through :D Paint one side of the stirrers with colours of your choice.

Once you have painted the stirrers, lay them out to to dry. Be sure to line your work area with newspapers so that you don't spill on paint on any furniture. I learnt this the hard way.


Now, find a sturdy surface onto which you are going to paste the coloured sticks. You can use the backing of the frame or use of piece of chart paper or the backside of an old photograph that is sure to fit the frame or a magazine cover. Any slightly sturdy sheet of paper will do. Cut the paper to fit the length and width of the glassed area of the shadow box.

Finally, time to glue everything together. I used Elmer's clear glue and applied it to the unpainted side of the sticks with a thin paintbrush. Keep pasting the sticks to the sturdy paper as and when you apply the glue so that the it doesn't try out. Mix and match the colours to create a fun effect.


Finally, put the paper with sticks into the shadow box. Choose a lovely well lit place to display. It makes for a lovely conversation piece and leaves you feeling extremely creative with little effort!


Wednesday, August 14, 2013

The Best Vegetarian Chili

I have never been a meat-eater.

By meat, I mean seafood and poultry as well .This is of course by virtue of being raised in a Tam-Brahm family. But that reasoning only holds good for a few years, if we are all being truly honest. At some point, every young vegetarian comes to a crossroad in their life where they consciously or sub-consciously decide to go or not go to the dark side :D To paraphrase the Bard himself, "To eat, or not to eat: that is the question". Or something like that.

For me, I have had several such opportunities when I was in college but something held me back. I cant explain or put a finger on it but I sub-consciously made that decision in my teens and it has stuck so far. For a lot of people, it is more straightforward than that, more of a conscious decision. If you ask Arvind, he insists that he will violently throw up of he eats meat. And he says this right in front of other meat eaters, which I find terribly rude but, hey, that's my dear husband for you!

I never questioned my decision to go meatless for the most part but there were a few times when I just wondered 'what if...'! The first was when I was working in good old Chennai. A colleague and good friend of mine used to bring mushroom masala to work. I never had really eaten mushrooms before so this was all new to me. Man, I just went nuts over it. The juicy, supple texture of the mushroom... that delicious chewyness, the spicy masala... I was in foodie heaven. My colleague was convinced that I would just love poultry and really tried to talk me into it! It makes me laugh to just think about it. Good times!

Anyway, here I am trying to make a hardcore non-vegetarian dish into a meatless meal. I believe Chili is traditionally made up of ground beef and sometimes ground turkey, the only veggies being onions and garlic. But if you ask me, you cant go wrong with beans and a whole bunch of veggies for some some real good flavour!


Look at that! Isn't that just gorgeous! Mmmmm veggies =P~

The Best Vegetarian Chili


Ingredients:
1 cup cooked black beans
1 cup cooked kidney beans
1 onion - chopped
4 pods of garlic - finely chopped
1 tomato - chopped
2 jalapeno - seeded and chopped
1 carrot - peeled and chopped
1/2 zucchini - peeled and chopped
1 cup mixed peppers (red, green, orange and yellow) - seeded and chopped
1/2 cup frozen corn kernels - thawed out
1 tsp cumin powder
1 tsp coriander powder
2 tsp oregano
2 tsp crushed red pepper flakes
1 cup water or vegetable broth
A bit of Mexican blend shredded cheese
salt to taste
crushed black pepper to taste
1 tbsp olive oil

This recipe serves 2
  1. Heat olive oil in a pan and saute the onions and garlic for 3-4 minutes, until soft and fragrant. Add the chopped tomato, jalapeno, carrot, zucchini, corn and mixed peppers. Add some salt to the veggies. Saute until slightly cooked, for about 5-7 minutes. 
  2. While the veggies are cooking, mix the black beans and kidney beans in a large bowl. Add a little water to them and mash them slightly with a potato masher. This helps the chili get a nice ooey-gooey texture which I love.
  3. Once the veggies are cooked, throw in the slightly mashed beans. Add the cumin powder, coriander powder, oregano, red pepper flakes, crushed black pepper and mix well. Adjust the seasoning as needed. Add in the water or vegetable and simmer for about 15 minutes with the lid on, stirring occasionally. Adjust the water/broth as well depending your preferred consistency. 
  4. Remove the lid and give this a taste. Adjust the salt  and other seasoning as needed. Simmer for another 5 minutes stirring occasionally.
Serve hot with shredded cheese and a side of corn bread. Enjoy the BEST vegetarian chili :)

Wednesday, August 7, 2013

Summer Corn Soup

I know this says 'Summer' soup but really soup is a great idea in any weather. I love a hearty veggie-loaded soup or chili in the winter or fall and a light,easy, brothy soup in the warmer months. It almost always is a one-pot meal. It is easy to make and doesn't make me feel bad about not having a food processor!!

It always bothers me when I watch these shows on The Food Network where fancy chefs whip out all sorts of food gadgets leaving me supremely annoyed at having what appears to be an inadequate kitchen. But I have to admit that pushes me to recreate dishes with what I have in hand, including ingredients, and this is yet to go wrong. Every time they use food processors to make sauces or pesto, I woefully glance at my trusty Preethi Blue Leaf and tell myself that it makes no difference. Preethi Blue Leaf can boldly go where any food processor has been and kick it. Yes, the lid of the bigger jar might be a tad too big. You might get the very hot chutney all over you when you try to pry it open. The smaller jar might ooze chutney juice all over itself and your hands when grinding. Gross. The juicer might be an utter disaster. But darn it, it can blend. I have used my trusty (and crusty, sadly) Preethi Blue Leaf to make everything from salad dressing to pesto to onion chutney and I am proud it. If only I could figure out how to make it not-so-oozy-juicy!

Anyway, back to where we were. Soup makes me happy. There is something about eat-drinking a bowl of hearty home made soup that makes me at peace with the world. Specially if it doesn't require a 'slow cooker' and takes me all of 15 minutes to make it!

Summer Corn Soup


Ingredients: 
1 cup frozen corn kernel -  thawed
1/2 red onion - chopped
2 pods garlic - chopped
1 juicy tomato - chopped
2 tsp dried oregano
1 tbsp chopped basil
1 1/2 tbsp EVOO
1 cup water or vegetable broth
Salt to taste
Pepper to taste

This recipe serves 1

  1. Heat 1 tbsp EVOO in a pan. Saute the onions and garlic till transparent, about 5 minutes. Add in the thawed corn, salt, pepper, oregano and saute for another 5 minutes. Add the water or broth and simmer for about 2 minutes.
  2. Transfer the onion-corn-broth/water mixture to a blender and blend  until it is relatively smooth. This is usually good when the soup is chunky with a bit of corn to chew. Set aside.
  3. Heat the remaining 1/2 tbsp EVOO in a pan and add the chopped tomato. Saute for about 5 minutes till the tomato cooks. Add the basil and saute till basil wilts. 
  4. Pour the blended mixture into this and stir until well combined. Adjust the salt and pepper as needed.
Serve hot, topped with crushed tortilla chips and enjoy!


Friday, August 2, 2013

Avocado and Veggies "Grilled Cheese" Sandwich

Friday mornings are usually very lazy for me.

Fridays are almost weekends in my book and I sure am not the only one who feels this way.. am I?

Usually, I cook every morning and send A off with some lunch but every Friday morning, I ask him if he wants to carry lunch. Surely, this is me manipulating him, but don't ever tell him I said so!! :-) Friday is no different from any other working day and there is no reason for him to not want lunch, but just me planting the idea is good enough. The rest pretty much takes care of itself.

Come 09:030 am, off A goes, no lunch in hand, dreaming of Dosas and Thali meals, leaving me dreaming about my new blog post with a fun lunch-for-one.

A is always very enthusiastic about eating anything new I make, bless him, but sometimes it is honestly just more fun to cook for myself. Just the thought makes me feel so free. I can use whatever ingredients I want, experiment with all sorts of weird combinations and pretty much make as big a mess without really, really, worrying about how it might taste.

This was one such experiments that ended up truly lovely. I have recently started thinking about cooking with avocado but using it in Indian cuisine is a challenge. I know some people make chutneys with it, but, lets just say - no thanks. My recent trip to Costco left me with about 5 avocados and the thrill of figuring out what to do with them. I had read in many articles that the creamy texture of avocado lends itself beautifully as a replacement for mayonnaise and I decided to make myself a grilled "cheese" sandwich.

I used brown bread with the avocado spread, cheddar cheese, lettuce, onions and tomatoes but you can use whatever cheese and veggies you want. If you have more time on your hands you can certainly use roasted eggplant or zucchini.


It was the best 10-minute lunch I had ever eaten.

Avocado and Veggies "Grilled Cheese" Sandwich


Ingredients
2 slices whole-wheat bread
1 avocado
2 leaves of butter lettuce/ romaine/ iceberg
4 slices of tomato
4 slices of onion
1/2 cup shredded cheddar cheese
Few drops of lime juice
1/2 tsp red pepper flakes
Salt to taste
Pepper to taste
Few drops of Olive Oil

This recipe serves 1

  1. Toast the two slices of bread on a dry skillet just to warm it up a bit. Set aside.
  2. Cut open the avocado, get rid of the seed and scoop out the flesh. Mash the flesh well till it's spreadable and a bit lumpy. Mix in some lime juice, red pepper flakes for some heat, salt and pepper. Don't let it sit aside for too long as the avocado tends to darken with time. 
  3. Spread generously over the toasted slices. Top with the shredded cheese, lettuce and your choice of veggies. Bring the slices together and apply a little pressure until they all stay in place.
  4. Brush some olive oil on the two ends of the sandwich and toast over a hot skillet until brown on both sides. This causes the cheese to melt and gives us some gooey goodness.

Serve with ketchup if you like. Personally, it tastes brilliant as is!

Monday, July 29, 2013

Mixed Berry Smoothie

I am what some people might call a 'morning person'. I swear I never thought I would ever say that about myself, but after seeing people like the husband, who basically wage an internal war every morning just to get out of bed, I feel like I can safely call myself a 'morning person'. I mean, lets be honest, I wouldn't go as far as actually getting up and going for a run or anything. That would be a 'VERY morning person'. I can just get up and go about my cooking or whatever else without having a why-does-life-do-this-to-me look on my face and that sure does make me a 'morning person'.

Being up and about early gives me a major appetite and I just have to eat breakfast everyday. Now this can get quite annoying just because there isn't always enough time to make yourself a happy-healthy breakfast every single morning -  key word being 'healthy' which kind of rules out upma, dosa etc.

This morning I decided to make myself the healthiest, easiest, most refreshing breakfast and it just gave me a great start for my day. Best part - it was ready in a quick minute.

All you need is your choice of fruit. I used mixed frozen berries (blueberry, raspberry and blackberry). I got these in a huge baggie at the supermarket. You can of course use fresh berries but I just find this more economical. If you are buying frozen ones, make sure there is no added sugar or that it isn't soaked in sugar syrup. The ingredients on the bag should just say fruit. No preservatives even (hopefully).


What makes this really healthy for me is that is that I don't have to add any additional sugar to this smoothie. The sweetness from the fruit is usually good enough for me. You can also add 1/2 an apple or 1/2 a banana if you like, for some added sweetness.This also gives me a good dose of protein with the Greek yogurt so yay!

Mixed Berry Smoothie


Ingredients:
1 cup frozen mixed berries
1 cup 1% or skimmed milk
1 tbsp plain non-fat Greek yogurt
1 blackberry - chopped (optional)

This recipe serves 1

  1. Heat the cup of frozen berries in the microwave for about 30s just to thaw it slightly
  2. Combine the berries, milk and yogurt in a blender. Blend until smooth and and thick. Adjust the consistency as needed with a bit of water.
  3. Top up with the chopped blackberry if you like.


Wednesday, July 24, 2013

Garlic Butter Spaghettini with Oven Roasted Tomatoes

I know I know I have been going on about "eating right" and "low carb food" and "*other-nice-healthy-food-words*" but it isn't the worst thing to splurge once in a while.. is it? It is? Well, sue me, I did anyway!

Seriously though, when I do splurge, I try and make it worth my while by cooking something I really enjoy. This doesn't necessarily mean a decadent, gonna-carry-this-guilt-around-for-weeks kind of meal. It almost always more of a relatively light but carby meal with some fresh ingredients that leave me feeling good. Like Dosa with Onion+Tomato Chutney. Or Jeera Rice with some spicy Moong Dal +Applam. Heaven indeed. What can I say, I got a bad case of rice-lovin'!

A couple of weeks back again, I found myself craving something starchy and home-made. One of those days where it just HAD to be had! With no dosa batter and no rice whatsoever at my disposal (curse me for purging my house of carbs), I had to rummage through my pantry to piece together a meal from my secret stash. Boy, am I glad I did....

Garlic Butter Spaghettini with Oven Roasted Tomatoes


Ingredients
3/4th of a box of spaghettini
1 cup cherry tomatoes, halved
4 pods of garlic, chopped
1 cup fresh basil, chopped
1/4 cup pecans or walnuts, Toasted in the oven for 10 minutes at 325F and roughly chopped
1 tbsp dried oregano
3 tbsp unsalted butter
1/4 cup grated Parmesan cheese
2 tbsp EVOO (Extra Virgin Olive Oil) + more for drizzling
Salt to taste
Black pepper to taste

This recipe serves 2

  1. Prepare the pasta al dente as instructed on the box. Be sure to salt the boiling water generously before adding in the pasta.
  2. Toss the halved cherry tomatoes in a bowl with 1 pod of chopped garlic and 2 tbsp EVOO. Mix well, spread out on a baking sheet, drizzle with the EVOO and roast in the oven for 30 minutes at 325F.
  3. Melt the butter in a pan and throw in the 3 remaining pods of chopped garlic. Keep the heat relatively low so as to not burn the garlic. Saute until soft and fragrant. Add in the chopped basil and saute till it wilts. Finally add the toasted nuts, roasted cherry tomatoes, oregano, salt and pepper. Mix everything well while still keeping the heat relatively low.
  4. Finally, fold in the cooked spaghettini with tongs until all the the ingredients mix well and the pasta comes together.
Serve topped with Parmesan cheese and enjoy!

Thursday, July 18, 2013

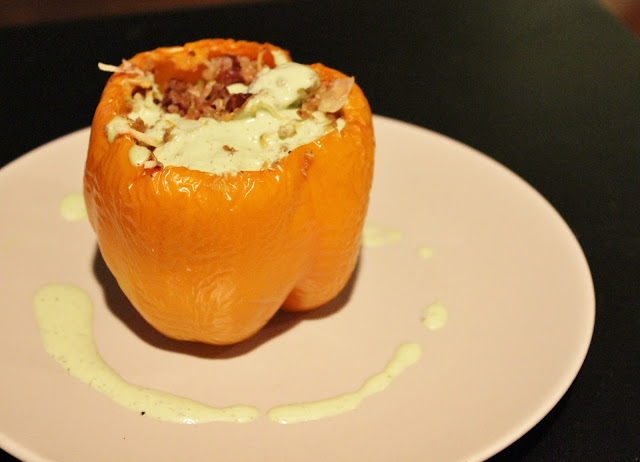
Quinoa stuffed Peppers with Basil Yogurt Sauce

Being a hard-core South-Indian, rice is a part of my everyday diet. I mean, despite all my culinary adventures, nothing would make me happier than a plate of steaming hot Onion Sambar Rice with Cabbage. But, the husband and I are trying to eat healthy and cut down on our daily carb intake, which means, rice is more of a weekend luxury for us. This, of course, includes dosas and idlis as well. What a tragedy!! But on the flip side, this has truly inspired me to cook some really fun, delicious healthy meals without which this blog wouldn't exist so yay!

I have always been into Food Network but since I started cooking I have begun to look at the shows in a different light - specially if the show features a vegetarian dish. A few days back I was watching a show called 'Giada at Home' in which Chef Giada de Laurentiis made a dish called 'Couscous-Stuffed Peppers with Basil Sauce'.. they looked SO delicious. This is Giada's dish here below.


As always there were several things in this dish that I couldn't use or didn't quite agree with so I attempted this recipe with a few modifications of my own. I have posted the original recipe below if you would like to try that out.

Quinoa stuffed Peppers with Basil Yogurt Sauce


Ingredients:


4 peppers : Red Yellow or Orange

Stuffing:
1/2 cup uncooked Quinoa or 1 Cup Cooked Quinoa (Subs: brown rice or Cous Cous)
1/2 cup canned garbanzo beans (chana), rinsed and drained
1/4 cup frozen corn
1/2 medium size onion - Chopped
3 pods garlic - chopped
1/4 cup dried raisins / cranberries
1 packed cup chopped baby spinach leaves - Chopped
1/4 cup Pecans or Walnuts (optional) (Toasted in the oven for 10 mins at 350F and roughly chopped)
1/4 cup extra-virgin olive oil, plus more for drizzling and sauteing
Salt and freshly ground black pepper
1/2 tsp Cumin Powder
2 tsp red pepper flakes
1/2 cup (4 ounces) crumbled feta cheese

Sauce:
1/2 packed cup fresh basil leaves
1/4 cup non-fat Greek Yogurt
3 tablespoons extra-virgin olive oil
1 tablespoon water
1 garlic clove, coarsely chopped
2 teaspoons fresh lemon juice
1/4 teaspoon sugar
1/4 teaspoon salt, plus extra, as needed
1/4 teaspoon freshly ground black pepper, plus extra, as needed

This recipe serves 2


  1. Add some olive oil to a pan. When it is hot, saute the onions, garlic and corn with salt till the onions are transparent. Shut off the heat and toss in the spinach. Saute in residual heat till the spinach is wilted.
  2. Cook the Quinoa in a pressure cooker using 1:1.5 quinoa : water ratio for 2 whistles. Alternatively, you can also just put 1/2 cup quinoa into a pan with 1 cup boiling water and stir occasionally till all the water is gone and the quinoa is fully cooked. Fluff it up with a fork. 
  3. Pour this into a large bowl and combine with the garbanzo beans, sauteed veggies, feta cheese, raisins, chopped pecans, some olive oil, cumin, red pepper flakes, salt and fresh ground black pepper.
  4. Cut off the tops of the peppers. Remove the stem and seeds. Make sure the peppers can stand upright without falling over. Stuff the peppers with the mixture from the bowl and place them upright in a baking dish with just 1/4 inch of water at the bottom of the dish so that the peppers can steam in the oven. Place the pan in the oven and bake for about 45 minutes at 350 degrees Fahrenheit.
Sauce:
In a blender, combine the basil, greek yogurt, olive oil, water, garlic, lemon juice, sugar, salt, and pepper. Blend until smooth.

Pour the sauce over the peppers and serve hot!

Shout out to chef Giada with many thanks: Click here for original recipe

Roasted Pepper and Corn Soup

Back home in Chennai, rainy days would give me a total craving for Chilli Bajji and a cup of hot coffee. Specially the chilli bajjis from Elliots Beach. Mmmm what could be better... How I bitterly miss my dear motherland!


Anyway, the absence of Elliots beach has forced me to look elsewhere for rainy-day-comfort food. So these days, my favorite thing to eat on a gloomy cold rainy evening is - Soup! I recently discovered this delicious soup recipe but it didn't really make a fan out of me until I modified the recipe to suit my palette. You can still try and make it the original way - I have included a link to it at the end of my recipe.

Oh and i learnt how to broil peppers in this recipe! Yay! Look at these beautiful broiled lovelies:


Ingredients:

2 bell peppers (red, yellow or orange, but not green)
1/2 cup Frozen Corn
4 tablespoons olive oil
I medium yellow onion, diced
4 garlic cloves, finely chopped
1 tbsp chopped basil leaves
1 tbsp red pepper flakes
2 cups water or Vegetable/Chicken stock
Salt and Pepper as needed
1/2 cup Croutons

This recipe serves 2
  1. Broil the 2 peppers in a broiler or a gas stovetop. If you are using a stovetop just hold the peppers one at a time over the open flame till the skin starts to char and turn black. Keep rotating the pepper until its covered with the black soot. Place the charred peppers in a large bowl, cover it and let it cool until the peppers are OK to handle. Then remove blackened skin using your fingers, stem, and seeds by cutting into quarters.
  2. Add olive oil to a large pot or pan. Once the oil is hot, sauté the onions and garlic until soft. Then add in the corn and sauté for a while until the corn is cooked. Add 2 cups of water/stock, as desired. I use water because i don't like the taste of stock and I am more than happy to kiss the sodium goodbye! Add the peeled red/orange/yellow pepper, basil leaves. crushed red pepper flakes, fresh ground black pepper and salt.
  3. Bring to a boil, reduce heat and cook, covered, for 15 minutes. If the mixture looks too dry, add another splash of water, but not too much, otherwise your soup will become very runny and not thick.
  4. Turn off the heat and allow to cool just a bit. Pour the mixture into a blender and blend until smooth and thick. Top with a ground black pepper, a few croutons and enjoy!


Shout out to the original recipe, with many thanks :  Click Here

Spaghettini with Tomato Basil Sauce

Anyone who knows me knows I am an anglophile and that I had a total dream-come-true moment when I went to England last year. I just lost myself in the magic of London. I indulged in one of my all time obsessions by going all by myself to Hampton Court Palace and immersing myself in the history of King Henry the VIIIth. Oh man I get giddy thinking about it. Look at that beauty...!


Now that England has been crossed off my vacay locations, the thought of Italy is slowly causing me to have Liz Lemon-esque *I want to go to there* moments. And who doesn't LOVE Italian food..! Soon after our wedding, my then-Italian-food-novice husband took to it like no other cuisine and I have been in culinary heaven since.

Ever since the cooking bug bit me, I have been trying to recreate easy Italian dishes that we eat in restaurants. My absolute favorite pasta dish at the moment is California Pizza Kitchen's Tomato Basil Spaghettini. It is an amazing dish - its lovely basil flavour and the creamy goat cheese is beauty on a plate.

Good food makes me happy.

Sure enough I was soon tempted to try making it at home with my own little twists and I'm happy to say it came out quite well! Not to mention, SO easy!! Now i must confess that this doesn't taste exactly like the CPK version because I have made this a little spicier than the original, among other things.


Ingredients:
1 of a box of Spaghettini
5 Tomatoes on the vine (or just any juicy large tomato)
1/2 cup fresh basil leaves
5-6 pods of Garlic
1 tbsp dried oregano
1/2 tbsp red pepper flakes
1/2 cup grated Parmesan cheese
2 tbsp crumbled Goat cheese
Salt and Pepper as needed
Olive Oil as needed

This recipe serves 2


  1. Prepare the pasta al dente as instructed on the box. Be sure to salt the boiling water generously.
  2. Blanch the 5 tomatoes. Click here for instructions on blanching. Chop up the blanched tomatoes into small cubes and mash them until it looks like a bowl of chunky tomato juice. Slice the garlic pods into thin slivers. Give the basil a rough chop as well.
  3. Heat some olive oil in a big pan and lightly fry the garlic. Keep an eye on it as garlic burns very easily. Pour in the chunky mashed up tomatoes, half of the chopped basil, salt, fresh ground pepper and bring to a slight simmer. Keep stirring this occasionally and continue to simmer until the tomato cooks and loses its raw flavour. This could take about 10 minutes and really allows the basil flavour to seep into the sauce. 
  4. Add in the oregano, red pepper flakes and  Parmesan cheese. Simmer for another 2 minutes then toss in the pasta. Fold the sauce well into the pasta. Turn the heat very low and keep folding until it is well combined. Add the remaining chopped basil and mix well.

Serve topped with crumbled goat cheese and a side of crusty garlic bread. Mmm Delizioso!


Skillet Frittata / Spanish Omelette


Ever since I've started watching Parks and Recreation, the dormant Ron Swanson in me wants to eat breakfast food all day.


I recently decided to take up that fantasy and make myself the most delicious dinner-worthy omelette. This would be no 2-minute dish. Seasoning would not be a measly salt-and-pepper. There would be no cracking-the-egg-over-the-pan. Not on my watch


After a lot of research, I decided to make my own version of a Spanish Omelette, slightly modifying the traditional version to suit my palette (i.e no gross raw tomatoes please). Not to mention, this has got to be one of the healthiest meals I have ever made myself!!

First, fry up some onions and garlic on a skillet with some olive oil. 


Add your veggies and cook until it is well done. Arrange them in an evenly-spread layer.


Pour the seasoned and beaten eggs over the veggie mixture. 


Cover with a glass lid and let it sit on very low heat so that the top portion of the eggs are cooked. When it is almost done, top with shredded cheese and cook for a little longer until the cheese melts. 


Use a spatula to gently detach the eggs from the skillet and slide it onto a plate, again - very gently. this dish is quite delicate and tears easy.


Ingredients:
3 Medium Size Eggs
1 small Onion
3 pods of Garlic
1/2 red/yellow pepper
1 Jalapeno
Spinach leaves ~1/2 cup
1/4 cup  any shredded cheese
Splash of Milk
1 tsp dried oregano
1 tsp red pepper flakes
Pinch of turmeric -- optional
Salt and Ground Pepper to taste
Olive Oil as needed

On the side: any sliced fruit - Apples, Pears, Kiwis, Watermelon, Peaches.. all good!
  1. Finely chop the onion, garlic pods jalapenos, red pepper, spinach into small pieces. Heat up some olive oil in a skillet and fry the onions and garlic, until the onions are transparent. Add a bit of salt to these to keep the onions moist. After about 3 minutes toss in the red peppers, jalapenos and the spinach to the skillet. Turn the heat low and stir occasionally while the veggies just cook for about 5 minutes. 
  2. While these are cooking away, break open the 3 eggs in a large bowl. You can probably use just one yolk and discard the other 2 if you wish. Beat the eggs just a bit until the yolk mixes in. Add the salt, pepper, oregano, red pepper flakes, turmeric and beat a bit more. Adjust the salt as needed since we have already added some salt to the veggies. Pour in the splash of milk, half the cheese the and beat until everything is well mixed and looks a bit frothy.
  3. Keep an eye on your veggies. When they look like they are cooked, pour the egg batter into the skillet and just roll the batter around the pan so that all the veggies are covered. Sprinkle the remaining cheese over the omelette. Turn up the heat just enough to cook the eggs. Take a glass lid and cover the skillet so that the top of the omelette cooks as well.  The glass lid just helps you see how things are coming along.  Again, please keep an eye on the heat so that the bottom of the omelette doesn't burn. 
  4. Use a spatula to gently lift the edges of the omelette to see how far its cooked. Once the top of the eggs look like they are cooked through, gently run a spatula around the edges and center of the omelette to just unhinge it from the pan, taking a LOT of care to not tear it in places. Again, very gently slide it onto a large plate. Tuck in and enjoy with  a fruit or some tea!